
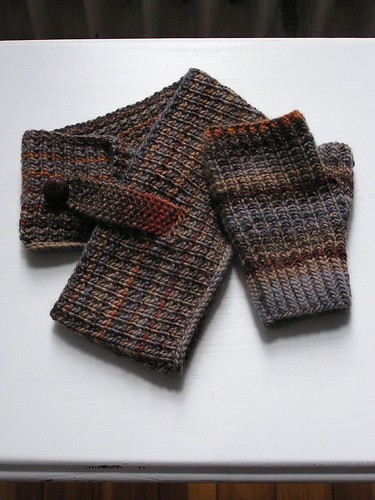
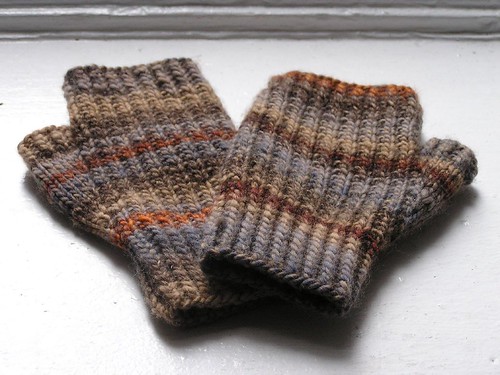
 Bainbridge Mitts (on Ravelry):
 Yarn: Approximately 150 yards of DK weight
Needles: US #5 (you can use a set of DPNs, but I like to use two circular needles)

Size: Women's Small
Abbreviations:
tbl - though the back loop
PM - place marker
M1R - make one right
M1L - make one left
Cuff:
CO 36 sts and join to knit in the round. Place a marker to indicate the beginning of the round and begin with twisted ribbing (K1tbl, P1) for the cuff. Work 12 rows of twisted ribbing.
Start the broken ribbing pattern for the hand as follows (for row-by-row instructions, scroll down to the bottom):
Pattern:
Row 1 (and all odd rows): Knit across
Row 2 (and all even rows): K1, P1 ribbing
Row 2 (and all even rows): K1, P1 ribbing
Work in pattern for 3 rounds. On the fourth round, begin increasing for the thumb gusset as follows:
Round 4: Work in pattern for 16 sts. PM, M1R, K1, M1L, PM, P1. Continue in pattern to the end of the round. You will work to increase the number of stitches in between the markers to create the thumb, and the remaining stitches (35 sts total) become the hand.
Continue to work in pattern for 2 rounds. On next round, work a gusset increase row:
Gusset increase row:
Work in pattern to 1st marker. Slip marker, M1R, knit to next marker, M1L, slip marker. Continue in pattern to end of round.
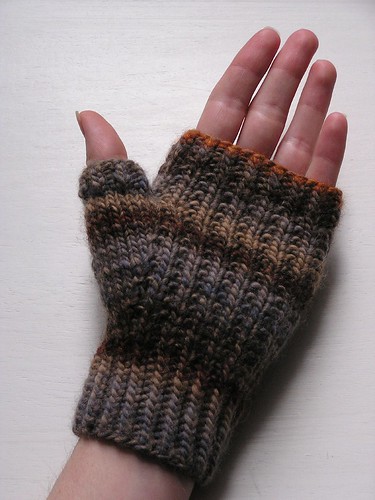
Continue in pattern, working the gusset increase row on every 3rd round until there are 17 sts between the markers. The hand will be worked in the broken ribbing and the thumb will be worked in stockinette (see photo).
Finishing Hand:
Place the 17 thumb sts onto waste yarn. You will have 35 sts remaining for the hand. Continue working the hand in pattern, casting on 1 stitch using the backward loop method when closing the hand to knit in the round to make an even number of stitches (36 sts total). Work in pattern until the mitt covers your palm to the base of your fingers. Work twisted ribbing (K1tbl, P1) again for 4 rows to cover the lower part of your fingers. Cast off loosely.
Finishing Thumb:Place thumb sts back onto your needles (17 sts total). You want an even number of stitches, so pick up 1 stitch at the base of the thumb where you cast on 1 stitch for the hand (for a total of 18 thumb stitches) and begin to knit in the round. Knit in stockinette for 1 row and then knit 2 rows of twisted ribbing (K1tbl, P1). Cast off loosely.
Weave in your ends. Work the second mitt the same way!
This is my first written pattern, so if you have any questions, just let me know! Thanks!
Row-By-Row Instructions
Cuff:
CO 36 sts and join to knit in the round. Place a marker to indicate the beginning of the round and begin with twisted ribbing (K1tbl, P1) for the cuff. Work 12 rows of twisted ribbing.
Start the broken ribbing pattern for the hand as follows:
Row 1: Knit across
Row 2: K1, P1 ribbing
Row 3: Knit across
Row 4 (gusset increase row): Work in pattern (K1, P1 ribbing) for 16 sts. PM, M1R, K1, M1L, PM, P1. Continue in pattern (K1, P1 ribbing) over the remaining 18 sts to the end of the round (38 sts total, 3 sts in between the markers become the thumb, 35 sts become the hand)
Row 5: Knit across
Row 6: K1, P1 ribbing
Row 7 (gusset increase row): Knit across to 1st marker. Slip marker, M1R, knit to next marker, M1L, slip marker. Knit across to end of round. (40 sts total, 5 sts in between the markers become the thumb, 35 sts for the hand)
Row 8: K1, P1 ribbing
Row 9: Knit across
Row 10 (gusset increase row): K1, P1 ribbing to 1st marker. Slip marker, M1R, knit to next marker, M1L, slip marker. K1, P1 ribbing to end of round. (42 sts total, 7 sts in between the markers become the thumb, 35 sts for the hand)
Row 11: Knit across
Row 12: K1, P1 ribbing
Row 13 (gusset increase row): Knit across to 1st marker. Slip marker, M1R, knit to next marker, M1L, slip marker. Knit across to end of round. (44 sts total, 9 sts in between the markers become the thumb, 35 sts for the hand)
Row 14: K1, P1 ribbing
Row 15: Knit across
Row 16 (gusset increase row): K1, P1 ribbing to 1st marker. Slip marker, M1R, knit to next marker, M1L, slip marker. K1, P1 ribbing to end of round. (46 sts total, 11 sts in between the markers become the thumb, 35 sts for the hand)
Row 17: Knit across
Row 18: K1, P1 ribbing
Row 19 (gusset increase row): Knit across to 1st marker. Slip marker, M1R, knit to next marker, M1L, slip marker. Knit across to end of round. (48 sts total, 13 sts in between the markers become the thumb, 35 sts for the hand)
Row 20: K1, P1 ribbing
Row 21: Knit across
Row 22 (gusset increase row): K1, P1 ribbing to 1st marker. Slip marker, M1R, knit to next marker, M1L, slip marker. K1, P1 ribbing to end of round. (50 sts total, 15 sts in between the markers become the thumb, 35 sts for the hand)
Row 23: Knit across
Row 24: K1, P1 ribbing
Row 25 (gusset increase row): Knit across to 1st marker. Slip marker, M1R, knit to next marker, M1L, slip marker. Knit across to end of round. (52 sts total, 17 sts in between the markers become the thumb, 35 sts for the hand)
Finishing Hand:Place the 17 thumb sts that are in between the markers onto waste yarn. You will have 35 sts remaining for the hand. You need to have an even number of stitches to begin working the broken ribbing again, so cast on 1 stitch using the backward loop method when closing the hand to knit in the round to make an even number of stitches (36 sts total).Begin working in pattern again:
Row 26: K1, P1 ribbing (36 sts for the hand)
Row 27: Knit across
Work in pattern repeating rows 26 and 27 until the mitt covers your palm to the base of your fingers.
Work twisted ribbing (K1tbl, P1) again for 4 rows to cover the lower part of your fingers. Cast off loosely.
Finishing Thumb:Place thumb sts back onto your needles (17 sts total). You need to have an even number of stitches to begin working the broken ribbing again, so pick up 1 stitch at the base of the thumb where you cast on 1 stitch for the hand (for a total of 18 thumb stitches) and begin to knit in the round. Knit in stockinette for 1 row and then knit 2 rows of twisted ribbing (K1tbl, P1). Cast off loosely.
Weave in your ends. Work the second mitt the same way!
Like this post? See more! Connect with me on facebook, instagram, and pinterest!
3 comments :
Very nice! Thank you for sharing the pattern. This is my first time visiting your blog and I LOVE your knitting. Very beautiful work.
Hi. I made the first mitt and want to let you know that I find the pattern you wrote very clear. The mitt is beautifull.
I love how you incorporated both broken rib knitting and traditional ribbed patterns.
Post a Comment